Tuesday 27 July 2021

Cutting things short

I have said several times in the past that when you are playing virtually online, short adventures work the best. At least that is my experience. The sessions for my Swords & Wizardry Campaign are never longer than three hours and the players like things to wrap up at the end of each session. In the last session, we completed module I7: Baltron's Beacon and it took five sessions. I think the players were really interested in closing things up in this last session. Once they found what they had come for they immediately left the dungeon. Leaving more than half of the final level unexplored and missing out on a lot of magic and treasure.

From a character standpoint, it was very wise. All of the characters were low on hit points. They were out of Healing potions and several characters had been brought back from unconsciousness. They had accomplished the object of their mission and found a few magic items. From a player perspective, I am used to players who look under every rock for the last gold coin in the dungeon.

Session 61: Unholy Shrine of the Green Flame

Lakima (human magic-user), Eathwund (human fighter), Alonso (human fighter), Aashdoshan (human necromancer), Domago (human cleric NPC), Lantosh (human fighter NPC), Fenris the Filch (human thief NPC), Vervork Merwin (human fighter NPC).

After a rest, Domago successfully removes the curse on Eathwund so that he can remove the cursed helm. The entire group crowds onto the platform and Lakima inserts the key. A glowing arrow appears and he turns the key so that the arrow is pointed at the rune translated as “dungeon”. After a few moments of waiting there is an intense flash of light and the entire group finds themselves in one of the open cells in the dungeon beneath the Keep. Luckily, they left the door unlocked and they return to the platform room in the keep. The key is still in the keyhole of the platform. Lakima turns the key to the rune translated as “shrine” and they wait again. There is a flash of light and they find themselves in a large room at an unknown location. They are standing on a platform with a glowing key in the center of it. Lakima quickly picks up the key and pockets it. Four iron doors lead from the chamber one in each wall. One door has a bas-relief sculpture of a demonic face. The only other thing of note in the chamber are four stone pillars holding up the ceiling. The pillars are carved with faces with open leering mouths.

Aashdoshan hops down from the platform onto the floor and makes a step toward one of the pillars. As soon as his feet touch the floor he triggers a trap. Water begins to pour from the mouths of all of the faces on all of the pillars. The demonic face animates and starts laughing, “You fools have sealed your doom!” As the face says the word sealed, they hear loud clicks from each of the four doors. In moments the water has already risen to the level of the platform. Alonso suggests using the key and teleporting away but the teleport platform is already awash with water and no longer glowing. Lakima points at a door and shouts at Fenris to get it open. Fenris rushes to the indicated door and yells back that it is locked. He gets to work and says, “I got it!” with undisguised surprise in his voice. He swings the door open. At that moment the rush of water stops.

Alonso, Eathwund, and Lakima run over to the door and enter the hallway beyond, and stop suddenly. The walls of the hallway are covered in metal and iron spikes 2 feet long. The spikes jut out from the walls leaving only a six-foot clear passage to a door. Fenris checks the spikes and declares that they will not move. But he warns that the black substance coating the spikes is probably a contact poison. They carefully make their way to the door which Fenris opens.

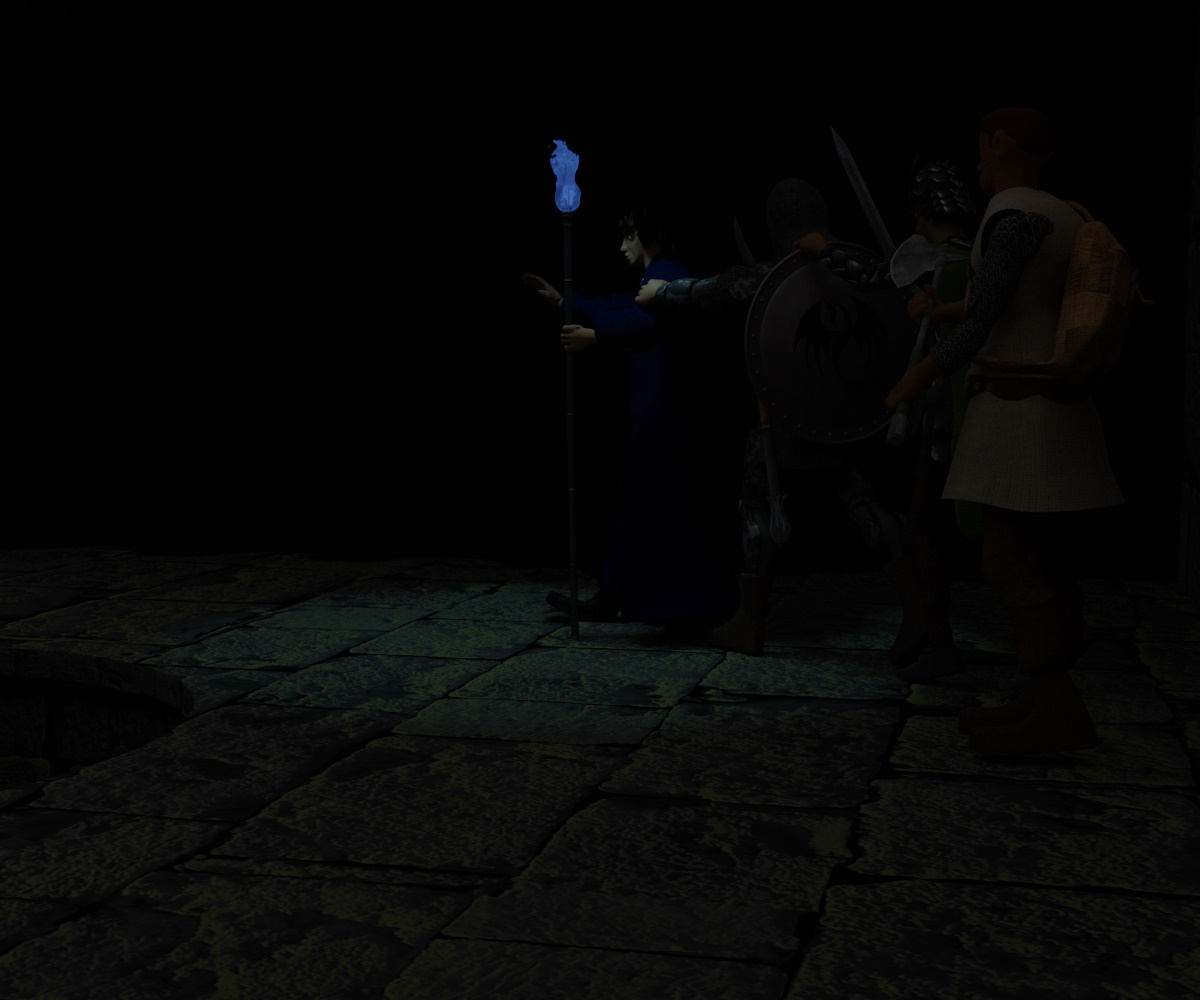
As the door swings open it disappears into complete darkness. The way beyond the door is completely dark. The darkness forms what looks like a physical barrier right at the doorway. As Fenris waves his hand through the doorway it disappears into the darkness. Lakima thrusts his Continual Light staff into the darkness and he does see a faint blue glow. Lakima tells everyone to link hands and to stay close to him as he shuffles cautiously into the darkness. Lakima finds he can see no more than 5 feet in any direction lit by the glow of his magical staff. It is soon apparent that they have entered a room. Lakima stops as he encounters a wall of black drapes. Fenris tears down a section of the drapes and finds a concealed passage.


Stepping through the passage they emerge from the darkness into a rough-hewn passage. The passage is unlit but their light sources are now illuminating the corridor normally. Fenris moves on ahead. Lantosh lights his lantern. Soon the passage leads into a chamber with no exits. Four stone sarcophagi rest on the floor of the chamber. As the strongest of the group, Vervork, Domago, and Alonso position themselves and slide the lid of one sarcophagus aside to reveal a dead body wrapped in rags. As they look for treasure the body moans and then sits up swinging its arms at Vervork. Domago brandishes his holy symbol and attempts to rebuke the undead mummy without success. Eathwund lights his sword on fire and strikes it hard in the chest – sand, and dust pour from the wound. The creature turns and strikes Aashdoshan knocking him unconscious. While Alonso fights the mummy, Domago pulls Aashdoshan to safety and revives him with a potion of healing. Alonso destroys the mummy with a well-placed stab and the creature collapses into dust. Lakima checks the coffin carefully but finds only dirt and rags.

They push open a second coffin and another mummy attacks. As they are fighting it the stone lids on the remaining two coffins slide aside and two more mummies step out and attack. Domago manages to turn one mummy which returns to its coffin. The other mummies are destroyed by Eathwund, Alonso, and Lantosh. Once the three are down the fourth one is destroyed in its coffin. A search of the coffins and the chamber yields nothing so the adventurers head back to the room of darkness.

With Lakima leading the way, and everyone else crowding around him, they again enter the darkened chamber. At the edge of his light – Lakima spots a dark hole in the floor. Dark mists slowly billow up from the five-foot in diameter hole. Without warning, Aashdoshan feels a pair of strong hands grab his shoulders and drag him toward the hole. He shouts a warning but all everyone else sees is Aashdoshan leap up into the air and dive into the pit. He falls down the pit with a yell that recedes into the distance. Next, Lantosh is grabbed by a pair of hands but alerted this time Eathwund and Alonso swing their swords at where they think the attacker might be. The swords swoosh through the air encountering no resistance. Lakima removes a packet of Dust of Appearance and throws it at Lantosh. Immediately, a humanoid form appears clearly clutching Lantosh from behind. Now with a target, Lantosh, Vervork, Alonso, and Eathwund move to attack. Unfortunately, Eathwund does not see the edge of the pit and he slips and falls into it with a yell. Falling after Aashdoshan. Alonso and Vervork continue to strike the creature several times until it dissipates and vanishes.

Far below, Aashdoshan lands with a splash in a pool of cold water. Unable to see anything he peers into the darkness. There are three more splashes and he immediately senses that his undead minions have leaped into the pit after him. He instructs one skeleton to sink down and find the bottom. In the darkness, he hears an occasional splash indicating that he is not alone. The skeleton stops 80 feet below him so he instructs it to swim back up to him. Around him, he senses many undead and he directs his minions to defend him. Aashdoshan swims a short distance away from the fighting. Another large splash is heard in the darkness. Aashdoshan calls out assuming one of his companions has followed him down. But there is no reply.

The splash came from Eathwund who hits the water and immediately begins to sink because of his heavy armor. Thinking quickly Eathwund activates the Ghost Armor and becomes ethereal. The threat of drowning now passed and he can roughly see the extent of the large cave he is in on the ethereal plane. Eathwund concentrates and flies back up the shaft to the room above. Once he is clear of the hole, he returns to the material plane. To his companions, it is as if he just materialized. Eathwund lets everyone know the situation Aashdoshan is in far below. A rope is tied off and tossed into the shaft. Fenris is asked to climb down.

Fenris climbs down to the end of the 50-foot rope still in the shaft. He gets out a torch and lights it. About 20 feet below him he sees the reflection of water. He sees undead Lizardfolk skeletons advancing on Aashdoshan and his skeletons. Fenris calls up to let the adventurers above know what is going on. They respond by lowering him further having attached another rope to the one he is holding onto. Fenris yells for them to stop as he nears the water. With the chamber now lit by a torch, Aashdoshan can clearly see the Lizardfolk skeletons. He uses his necromancy to take control of most of the lizardfolk skeletons. He sets the controlled skeletons to attacking the few he does not control. Then he swims over to the rope. Realizing his frail body will never climb up the distance of the shaft, Aashdoshan casts the spell Strength on himself. Then he climbs up followed by his minions. He directs the Lizardfolk skeletons to fight each other until only one remains.

After a long wait, Fenris and then Aashdoshan climb back up into the darkened chamber. Lakima continues to lead them around the chamber and they find another exit. Once they cross the threshold of the chamber their lights again function normally. The hallway they have entered ascends at a sharp angle up to another door. Fenris cautiously makes his way to the door. He checks it and then tries to open it. As soon as he does, oil sprays from the walls covering the ramp from the door all of the distance to the room with the pit. Eathwund tries stepping and finds it is almost impossible now that the floor is slick with oil. Fenris calls back that the door is fake, there is only a blank wall behind it. He ties a rope to the door and tosses it down the ramp. Everyone on the ramp grabs a hold of the rope and makes their way back down to the room engulfed in darkness.

Walking to the last wall of the chamber they find more black drapes that they tear down. Beyond is another corridor. This corridor ends in a door. The door opens easily and they find themselves in the Shrine. The room is oddly shaped and the floor and walls are covered in black and purple stone blocks. Across from them is an altar on which rests an enormous ruby, a closed book, and a chime. Behind the altar is an iron statue of a robed skeleton. To their right is a stone statue of a frog demon holding a bowl of water. To their left is a granite block on which rest the Brazier of Green Flame. The adventurers enter the chamber spreading out and approaching different items. As Alonso approaches the altar the chime rings out one clear, loud note. The ruby shatters and red mists pour forth. The mist forms into an enormous demon.


The adventurers all turn to look at the 12-foot-tall demon and scramble to draw weapons. Before they can react, the demon vanishes. Lakima tells Aashdoshan to quickly come over to the brazier. It looks like a stone bowl filled with dark green liquid. A greenish-yellow flame flickers across the surface of the liquid. Lakima distracts Domago by asking him to check the iron statue – then he tells Aashdoshan to quickly fill a flask with the liquid. Aashdoshan fills one flask and hands it to Lakima. Then he quickly fills another and hides it in his robe. Curious, Aashdoshan removes his glove and puts his skeletal hand into the green flames. He does not feel anything so he removes it. Lakima then tells everyone that they need to find a way to destroy the brazier (this is the mission the Duchy sent them on). Vervork and Lantosh grab the brazier and dump the contents on the floor. The dark liquid creates a pool on the floor but the flame continues to burn in the brazier. Lantosh tells everyone to look at the flames, and they all see a small amount of liquid slowly pooling beneath the flames in the bowl.

Lakima goes over to the statue of the frog demon and fills a flask with the dirty water in the bowl. He then pours the water on the flames. The flames gutter but do not go out. He goes over to the altar and opens the book. He finds it contains detailed ceremonies of the Cult of Hool written in the old common tongue. He closes the book.

Vervork and Lantosh manage to pick up the heavy brazier and they flip it upside down on the floor. After a wait, they turn it over but the flames are still burning. Domago suggests using the Ring of Wishes to destroy the brazier. But it has only one use so Lakima argues against it. A vote is taken and only Domago and Eathwund vote to use the ring. Once it is clear they have no new ideas for destroying the brazier or putting out the flame, they decide to take it with them. Lantosh and Vervork rig a rope around it and drag it across the floor and out into the corridor. Lakima leads the way as they approach the chamber of darkness telling everyone to stay close. Lakima enters the darkness with Eathwund and Alonso closely behind him. After a few steps, he sees the demon step forward from the darkness towering above them. Perhaps expecting something like this to happen, Lakima is prepared and immediately pulls out the Pendant of Demon Summoning while calling out the true name of a demon he found in the book in Balutron’s library. The demon laughs at the name which is clearly not his. Then stops laughing as Lakima uses the power of the pendant to allow a Charm Monster spell to take control of the demon. The demon growls in frustration but stays back. Lakima orders the demon to tell him how to destroy the brazier. The demon replied that they would need a Wish spell… or just drowning it in water would do. Lantosh and Vervork drag the brazier to the edge of the pit and topple it over the edge. After a few moments, they hear a large splash from below. Lakima then tells the demon that it only needs to perform one task before he banishes it to the abyss. He tells the demon to leave immediately and return with Zweis Radu (an old enemy who got away). The demon then vanishes.

While they wait for the demon to return, the adventurers make their way to the room with the platform and the demon face. A few minutes later the demon returns with a terrified prisoner, Zweis Radu who thought himself safe in the Shattered Islands. Lakima taunts Zweis and tells him that they now own his former Manor House in Edgerton. The demon is banished to the abyss. Aashdoshan asks Eathwund for the details on who this Radu fellow is and he learns about the Veiled Society.

While these conversations are going on Alonso goes over to the demon face. He examines it and the eyes open and the face tells him, “You will never get past me!” and then laughs. Alonso tries to open the door without success. Angered by the taunting he swings his sword at the face. His sword just bounces off the solid iron as the face continues to laugh.

Lakima suggests that they have accomplished their mission and should return to Edgerton. Fenris is the only one who rejects, “But what about Balutron’s gold” Lakima assures him that they can always return. They are the only ones with the key. Fenris can be heard muttering, “that’s what you said last time.” The adventurers gather on the platform and the key is turned to the rune marked “tower”. They immediately teleport to the tower. Lakima is all for leaving immediately. But a quick glance outside reveals that it is the middle of the night. Judging by the position of the moon a few hours after midnight. So, they decide to stay one more night. They set watches. During the night Aashdoshan and Domago are disturbed by a will-o-whisp during their watch. They wait hoping the spirit will move on if they ignore it. But the ball of light launches itself at Domago and shocks him with a blast of lightning. Aashdoshan casts magic missile striking the will-o-whisp and that seems to drive it off. Everyone goes back to sleep.

The next day the group collects the hippogriff from the gatehouse and sets out across the causeway to Bleakmarsh. They stop in for supplies at the tavern. The tavern keeper does not seem surprised to hear that the brigands at the keep of the tower were driven off or killed (likely warned by the fleeing bandits). He does not seem very happy about it. The adventurers put up with a lot of angry glares before deciding to move on to the Dolm river. Late in the afternoon, they arrive at the river – but their boats (and boatmen) are gone. Fenris reminds everyone that they told the boatmen to wait 3 days. They have been gone a week. Just when it seems they have a long walk ahead of them they see a riverboat coming upstream. The boat is flagged down and the captain is happy to take on the strange group once he is paid upfront in gold.


Wednesday 21 July 2021

Hiding the Key

Last weekend our group played Session 60 in my Swords & Wizardry campaign. I am surprised we got to 60 sessions since this was originally going to be a one-shot of In Seach of the Unknown. In those 60 sessions, we have played through 42 different adventures. Most of these have been ones I rewrote or modified from published adventures - a few were original. As you can see from the number most of the adventures last only a single session. When playing online, with a group of players that changes all of the time, my preference is for short adventures.

This adventure, which is a modified version of I7: Baltron's Beacon is an exception as it has taken 3 sessions so far and I expect at least one more session. But it almost ended this week.

The players found a teleport platform in the Keep from which Baltron's Beacon emanates. But that platform requires a key for it to work. In the published module there are 2 hiding places in rooms on the same floor of the keep to find keys. One requires a secret door roll, but the other just requires players to look carefully. I added a third location for a key to be found. There is an escape tunnel from the keep on the dungeon level with what appears to be an emergency kit packed in a wooden box. I removed the Wings of Flight and placed the third key. It turns out that was necessary.

The players explored the keep and were unable to find a key and they were unable to find the dungeon level (a concealed trap door leads to the dungeon). I do not like to have NPCs solve things for the players so I just had the cleric NPC indicate he wanted to stay and continue to search for the key when the players decided they wanted to give up. The players were a little exasperated with the cleric but they were on an important mission sent by the rulers of the Duchy and it made sense for the NPC. Another NPC suggested another search of the cellars. Eventually, they found the dungeon level. But the dungeon level is just a dead end - this is not connected to the level they needed to find. The key on this level was also fairly well hidden. The players actually traded for the box containing the key and did not find it at first. Then they checked one last time and found the hidden compartment.

There was a lot of rejoicing once the key was found. The players had spent the entire session looking for it. In the end I think I handled this correctly. I was ready to let them walk away and fail on their mission but I wanted to give them another chance to succeed. This is why a number of commentators on adventure design warn you of the dangers of hiding critical path clues or items.

Of course, if they had not found the key I would have had it come back to affect their world at some point in the future.

Session 60: Search for the Key

Lakima (human magic-user), Eathwund (human fighter), Alonso (human fighter), Aashdoshan (human necromancer), Domago (human cleric NPC), Lantosh (human fighter NPC), Fenris the Filch (human thief NPC), Vervork Merwin (human fighter NPC).

The members of the Company of the Black Dragon are resting on the second floor Balutron’s Keep in the room that appears to be an alchemy lab. All of them are injured some seriously. They all take turns resting. Aashdoshn pokes around on the alchemist’s workbench and takes a few items that look interesting. On one watch while they rest, Alonso hears a crash from the level below. But nothing else happens.

Lakima asks Aashdoshan if he can cast Speak with Dead on the corpse of the wizard Antarcus. During the rest, Lakima read through Balutron’s journal which hints at a secret shrine under the Keep accessible only by a teleport platform. Balutron mentions finding a key in his journal but does not describe it. He also mentions storing his accumulated magic treasure in a vault that is shielded from ethereal and astral travel.

Aashdoshan casts speak with dead on Antarcus. The wizard’s spirit rises up out of his corpse and answers three questions. Aashdoshan asks Antarcus where the key is to the teleport platform. The spirit laughs and taunts him, telling him that in three months of searching Antarcus was unable to find a key and he claims to be a lot smarter than the heroes. They also ask him why he came to the keep to which Antarcus answers that he knew from the emergence of the beacon that Balutron was dead leaving his magic for any to find.

The heroes set off in a search for the key to the platform. Fenris examines the platform and describes what he suspects the key looks like. The heroes search the keep almost from top to bottom. Fenris is even lowered down the well in the kitchen. When they do not have any success they discuss giving up and returning empty-handed to Edgerton. On one last search, they find a hidden trapdoor in the cellar. They open it and see a shaft and ladder descending down.

The adventurers descend an iron ladder for 40 feet and arrive in a chamber roughly carved out of the rock. A passage leads south to a heavy wood and iron door. The door is locked, but Fenris tries the rusty keys they found earlier and discovers that one of them fits the lock. He opens the door and finds a jailor’s room. The room is covered thickly with mold. Over a desk and chair. Water seeping in from the ceiling. The mold proves to be harmless if a little slimy. Fenris uses the keys to unlock a door that leads to a dusty torture chamber. Then he unlocks a barred door that leads to five prison cells.

Checking in the cells they find a skeleton sprawled out in one cell. Fenris reports that there is a medallion hanging about the neck of the skeleton. Aashdoshan has one of his skeletons remove the medallion and bring it to him. But, as soon as the medallion is removed, a ghostly apparition rises up and floats over to Aashdoshan. The apparition attempts to strangle Aashdoshan with hands that briefly have to become corporeal while strangling him. Eathwund and Alonso swing swords at it but their magic swords pass harmlessly through the apparition. The heroes find that spells and physical weapons seem to pass right through the apparition harmlessly. Meanwhile, the apparition continues to struggle with Aashdoshan attempting to strangle him. Eathwund speaks his armor's command word and becomes ethereal. Now on the strange ethereal plane, Eathwund sees the solid form of the apparition before him. The creature now looks like a monk dressed in ragged clothes. He attacks repeatedly with his sword while the creature continues to try and kill Aashdoshan. It takes Eathwund five strikes with his sword to vanquish the apparition which departs shrieking in anger.


Aashdoshan assures everyone that he is okay and he thanks Eathwund once the latter returns from the Ethereal plane. Fenris busies himself searching the other jail cells and finds a secret door in the back of one. He opens it and sees a rough-hewn passage stretching out of sight into the darkness. The passage smells damp and he can just make out echoing voices in the distance speaking in a language no one understands.

Fenris cautiously slips down the passage into the darkness. Eathwund, Alonso, and Vervork follow at a safe distance. After more than 100 feet of tramping through the passage, Fenris comes back and tells everyone that there is a large, natural cavern ahead. He reports seeing seven ogres and a trussed-up lizardfolk captive. It looks like the ogres are preparing to eat the Lizard Man. Lakima and Aashdoshan advise the group that they will have to stay out of the coming fight in the cover of the passage while the fighters take on the ogres because of their weakened state. Lantosh volunteers to stay back and protect the mages.

Alonso rushes into the cave and attacks the nearest ogre who is just getting up from drinking murky water from a pool. Eathwund, Vervork, Domago, and four skeletons head the other way and confront five ogres. These ogres are soon joined by four more. The adventurers find themselves outnumbered but Aashdoshan casts Web and traps five of the ogres in a sticky web.  Alonso manages to kill one ogre with help from Lakima who is throwing darts. Eathwund kills one as well and Domago, Vervork, and the skeletons kill an ogre. Things are starting to even out when they hear a loud voice in simple common yell out from a cave to the south demanding to know what is going on!

A giant humanoid figure strides out of the cave to the south. At least 14 feet tall, wearing primitive skins and with a small tree slung over one shoulder. Seeing the heroes the giant levels the tree it uses as a club and strides angrily toward Alonso. Then Lakima successfully casts Charm Monster on it. The creature stops, scratches its head in confusion, and asks Lakima what the problem is in broken common. Lakima shouts, “They are the problem!” while pointing at the ogres.

The giant nods and advances on three ogres driving them back from the heroes.  But two more voices are heard from the cave to the south. Aashdoshan casts Darkness on the cave mouth and they hear confused shouting. Then Lakima casts a Lightning bolt into the darkness. They hear yells and screams but the two giants to the south continue to move about in the darkness. So Lakima casts Wall of Iron blocking the entrance to the cavern.

The friendly giant subdues the ogres that were not trapped in the webs and then removes the other ogres from the webs. The ogres try arguing with the giant to no avail. The giant comes over to Lakima and asks his new friend if there is anything else he wants to do. Lakima asks the giant about a key or other areas of the caverns but the giant does not seem to know very much. He and his friends found these caverns but were attacked by several humans including a wizard. Several ogres were killed and one giant. They are hiding here. After entering the cavern, the wall collapsed behind them. The giants set the ogres to clearing the rubble but the ogres are very lazy. Lakima asks the giant to make the ogres go back to clearing the rubble. Aashdoshan tries speaking with the tied-up Lizard Man but it just looks at him blankly.

After a few minutes, the ogres break through the rubble and run away the giant angrily yelling at them. They follow the ogres to an exit trapdoor that opens onto an island in the swamp outside the walls of the keep. Lakima asks the giant if he and his friends found any treasure. The giant tells them that they found a wooden box with a pack inside it. Lakima asks where it is now. The giant tells him it is back in his cave with his other belongings.

They head back to the cave. The darkness spell has expired. A few hours later the wall of iron spell expires. The giant walks into the cave and gets into a loud argument with his fellow giants. Eventually, he emerges with a backpack. Fenris searches the pack and finds some rope, a few coins, and a few gems. Lakima asks the giant if they can have the wooden box as well. The giant goes and collects the large wooden box and drops it near Lakima. It is empty. But, Fenris pokes around in the box and finds a secret bottom. Inside is a small sack that contains a strange key. The heroes celebrate finding what they believe is the key to the teleport platform.


Lakima bids the giant farewell. The giant offers to come with him but Lakima tells the giant to leave with the other giants. The three giants then leave the caverns. The heroes ascend back up into the keep. Realizing they are still suffering the effects of several battles – they decide to rest. Lakima uses the time to cast identify on several objects. The Helm taken from the ranger is identified as a Helm of Free Action. Lakima hands it to Eathwund who tries it on. Too late, they discovered that it is a Cursed Helm. Eathwund is now susceptible to suggestions from Lakima. Domago assures Lakima that once he has prayed to St. Aleena, he should be able to remove the curse. Eathwund tells Domago that there is nothing wrong with his new helm. The group then settles down to rest.


Saturday 17 July 2021

Baltron's Beacon Assault on the Keep

In the last session, the players continued their assault on Baltron's Beacon (called Balutron's Beacon in the Dolmvay setting). This time they assaulted the Keep. In the previous session, they had taken the Gatehouse from a number of brigands. All of the brigands were killed or chased off. They then rested and regained spells.

This gave me a week to think about how the wizard in the Keep would react to having a group of adventurers attacking him. He had lost all of his hired brigands but still had two companions. A charmed ranger and a weretiger. The write-up of I7: Baltron's Beacon gives a detailed suggestion for an ambush if the players attack the Keep head-on. I decided to run it pretty much as detailed in the module. The wizard was definitely aware of the intrusion from the adventurers. They had cast a fireball spell and set off a pair of Explosive runes traps. Also, I did not feel that the Wizard would leave. He had great confidence in his abilities and had not found any of the treasure he came to the Beacon to find.

The second half of this session, after the combat, became more of a puzzle-solving mystery. Here the players struggled. If they want to go further they are going to have to reason some of this out.

Session 59: Assault on the Keep

Lakima (human magic-user), Eathwund (human fighter), Alonso (human fighter), Aashdoshan (human necromancer), Domago (human cleric NPC), Lantosh (human fighter NPC), Fenris the Filch (human thief NPC), Vervork Merwin (human fighter NPC).

Late in the evening around midnight, the adventurers rise from their rest. The wizards memorize new spells and Domago has prayed to St Aleena for new miracles. Lantosh and Vervork stayed alert during the rest as they were not injured. Aashdoshan busies himself raising several skeletons (now six in total).

The adventurers make a direct approach to the keep. It is dark but the night is filled with the sound of insects. A set of stone steps leads up the side of the keep to a door. Fenris climbs the steps and passes over a pair of wooden boards that bridge the gap to the entrance. He immediately comes back and excitedly tells the rest that there are a pair of crawling creatures in the entrance hall.

Aashdoshan decides to send one of his servitor skeletons to draw out one of the crawlers so everyone can attack it. The skeleton makes its way into the entrance and then backs out followed by a crawling creature whose mouth is surrounded by eight tentacles. The creature is attacked by the skeletons and by missile weapons from the adventurers and it soon collapses, and rolls off the platform to fall 15 feet down onto the rock below. The second crawler is more reluctant to come out of the entrance. So eventually, a skeleton followed by Alonso goes in and gets it. They kill it in the entrance hall. The rest of the adventurers come up to join Alonso. Fenris finds the end of the hall is blocked by an iron portcullis. Lantosh and Eathwund try to lift it but they are unable. Just then, a wooden table resting against the wall animates into a mimic and attacks Eathwund. It is unable to get past the hero’s defense and he soon hacks the mimic down. It dissolves into a puddle of sludge. Just as the mimic dies, steaming hot oil pours down from murder holes in the ceiling, and arrows fire at the adventurers from slits in the walls. A barrage of magic missiles strikes Eathwund and Alonso. Alonso runs back out to the outside but Lakima, Eathwund, Fenris, Aashdoshan, and Lantosh are caught partially under the oil and injured. A flaming arrow fires out of a slit lighting the oil and a fire breaks out. Only Fenris is caught fully in this fire and he staggers outside where Vervork pats out the flames. Lakima casts Aztazibar’s Acrid Finger and burns a hole through the portcullis allowing those trapped in the hall to escape.

Once the fires subside the rest of the heroes join those who have passed through the portcullis. They find a deserted dining chamber covered in cobwebs. An arrow flies past the heroes striking the far wall and they see a figure to the south firing arrows at them. Alonso and Eathwund charge down the hall – but by the time they get there the attacker is gone.

In this chamber, they see a trapdoor in the floor – a ladder leading down into a cellar and a staircase leading up to the next floor. After a brief debate on which way to go – Fenris is sent up the stairs. He reports back that the stairs lead to a landing on the next floor with a door. Another stair continues up to the next level. Fenris is told to check the next stair. He leaves and comes back quickly yelling, “Dragon!” Lakima questions Fenris on what color of dragon and he has problems remembering. He tells them it was blue or maybe purple. It appeared to be sleeping.

The entire company moves to the next level landing. There is a door here but they decide they should deal with the dragon first. Ascending the stair, they come to a room with one wall collapsed and looking out over the open roof of the keep. In the corner of the chamber is a hot stovepipe ascending from floor to ceiling. The “dragon” is curled up sleeping near the pipe. Lakima immediately states that the dragon is a wyvern. Wyverns are not as smart as dragon’s but they are large and have a poison stinger.

Aashdoshan sends all six of his skeleton minions to surround the wyvern and hold down its tail. Alonso moves up and takes a swing at it but misses. The wyvern immediately awakens and screeches in anger. It snaps at Alonso with teeth and claws. The rest of the heroes join the fight and the wyvern – which appears old and frail – is quickly killed. Aashdoshan sets about examining and removing its tail. Fenris yells, “Look out – here comes another one!” and a larger, younger wyvern lands on the roof and moves to attack them. The skeletons form a line blocking the entrance from the roof and they attack. The skeletons are tossed about by the wyvern and two of them are bitten in half. Alonso and Eathwund join the fight and the wyvern is beaten back. Then Alonso strikes it with a mighty blow to the neck and the beast is killed.

On the open rooftop, the adventurers see some of the damage caused to the keep by the beacon. A stream of greenish-yellow light erupts from a hole in the roof and shoots straight upward into the sky for hundreds of feet before dissipating. They stand on the edge of the hole and look down but do not see much. Aashdoshan orders one of his skeletons down into the hole and it drops down to the floor. Nothing happens to it so everyone leaves the roof and descends down the stairs.

Eathwund and Fenris find the door is being held by something but they manage to shove it open. They see a thick carpet fall to the floor. In the room, they see murder holes in the floor and empty pots. At the far side of the chamber before a door a man in plate mail stands ready with a bow. He fires an arrow at Eathwund which is deflected aside. Alonso charges the man – who drops his bow and draws a longsword. The two fighters exchange strikes and it is immediately apparent that the man is a masterful fighter. Eathwund, Lantosh, and three skeletons join the fight. Lakima calls out to the man to surrender. But the man grips his sword grimly and continues to fight despite the hopeless situation. Unable to get past the defenses of Alonso or Eathwund – the man slashes down one of the skeletons but this is the opening Alonso was waiting for and he stabs the man with a killing blow.

The adventurers look about and see two doors from this chamber. Vervork and Fenris move to the door the man was defending and Fenris whispers that he can hear some sort of “four-legged beast moving about”. Lakima gestures at the other door and they open it into a warm chamber that appears to be an alchemy lab. A workbench and shelves are covered with bowls, pitchers, glassware, and jars. In one corner they see an iron stove that is putting out a lot of heat. In another corner is a large wooden closet. Fenris opens the closet and they find a number of strange items including the skull of a unicorn. Fenris opens a door to the north and they find a small library with a desk and chair. Lakima and Aashdoshan enter and check about the shelves. One large shelf holds all manner of books on a range of subjects. Aashdoshan takes a book on diseases. On the desk, they find two journals. One is very old and belongs to a High Priest of Hool who once lived on this site hundreds of years ago. The other is a journal of the wizard Balutron. Lakima flips to the last page of Balutron’s journal and learns the wizard was preparing to attempt to summon a spirit of the swamp. It is dated 40 years ago. One small shelf is protected by wizard-locked, unbreakable glass doors. Behind the glass are 12 books.

Satisfied that there is no one in these rooms, the heroes go back into the hallway where Vervork and Lantosh have stood on guard at the door. Fenris checks the door and declares it free of traps. Then he moves back – far out of the way. Alonso swings open the door with Vervork and Eathwund backing him up followed by two skeletons. A huge cat-like beast with a strange striped hide (a tiger) leaps onto Alonso tearing away at him with teeth and claws. Alonso struggles to keep it at bay. Eathwund strikes the beast a few times and Alonso is raked with a claw again. Then both Alonso and Eathwund strike the beast killing it. They hear someone cry out, “Virna! No!” and they see Antarcus the wizard at the far side of the room – a bat resting on his shoulder. Antarcus casts a spell and a hail of biting ice strikes at all of the adventurers. After a moment the hailstorm is gone but the damage is done. All of the adventurers are badly mauled. Lakima says, “Now you made me do it!” and he tosses a fireball at Antarcus. The flames expand outward from floor to ceiling and blossom out toward the heroes but just fall short of enveloping them. As the smoke clears the room beyond is blackened and burned. The bat has been vaporized. Antarcus is alive but is clutching a door frame and muttering incoherently. Alonso rushes in and stabs the wizard, ending his life just before Lakima shouts, “Wait!”

The heroes take a moment as Domago tends their wounds one after another. He prays for healing for Eathwund and Alonso. Some of the other, badly injured heroes like Vervork and Lantosh are advised to stay to the back of the group. They search the chamber. Find a cluttered closet which they check briefly, they find the blackened remains of Antarus’ spellbooks. One was destroyed but two escaped serious harm. In the chamber where Antarcus died, they find a strange stone platform with a keylike depression in the middle and five runes around the outside. Lakima casts read magic and reads the runes as, “mountain, shrine, swamp, island, dungeon”. He guesses that it is a teleport portal but he has no idea how it operates. Lakima tells everyone to look about for a key. They search the chamber and the dead bodies. The cat-beast has turned from a beast to a young woman – apparently, she was a were-creature. They do not find anything else interesting.

The entire group heads down to the entrance level to check for more rooms. Lakima finds a chamber with a layer of mist curling about his ankles on the floor. As Alonso walks into the chamber, the mist forms into three humanoid shapes that attack. The mist brushes past armor and clothing and seems to draw blood right out of the skin. Eathwund is attacked and injured but one of the creatures. But they do prove susceptible to damage from corporeal weapons and two of the creatures are killed, a third flees outside.

Next, they investigate the cellar from the trapdoor. Fenris peers over the edge and spots a group of trolls searching for food in the cellar. Lakima casts Fireball into the cellar catching all of the trolls in the blast. They descend the ladder to the cellar and find three badly injured trolls that are killed quickly. Lantosh puts their corpses to torch. In the cellar, they find a lot of rotted foodstuffs and other supplies. Lantosh does find a set of eight rusty keys. He pockets them thinking they might come in handy.

Upstairs Lakima tries the keys in the indentation on the platform but they are far too small. He notes that the end of his staff might fit and he tries inserting and turning it but nothing happens.


The adventurers head back up to the roof and peer down into the hole where the beacon resides. Fenris is berated until he agrees to climb down and investigate. He finds a brilliant beacon that seems to appear out of nowhere and blasts high into the sky. He also finds Aashdoshan’s skeleton minion standing dumbly by the beacon. Everyone else climbs down and they try to examine the beacon without touching it. Lakima guesses that this is not the Green Flame source of the potions of human control. Aashdoshan instructs his skeleton to walk into the beacon which it does. It stands in the beacon for awhile and then slowly starts to crumble apart. Eventually, collapsing to the stone floor a few bones and a pile of ash. Aashdoshan takes off one of his gloves and extends a finger into the beacon. It feels sort of like flame but it is cool to the touch. As he watches, the tip of his skeletal finger begins to age and corrupt. He immediately removes his hand from the beacon.


Perplexed by the beacon the group climbs out of the beacon chamber and heads back downstairs. Lakima casts knock and removes the enchanted lock from the bookcase. He removes and checks all 12 books on the bookcase. All of them radiate magic. One is a fake book with a scarab inside it, a couple function like protection scrolls and some are deeply disturbing. Then one book explodes when he opens it. Lakima, Aashdoshan, and Fenris are all caught in the blast. Lakima is knocked down but barely retains consciousness. But Fenris and Aashdoshan are knocked unconscious. Domago rushes into the room and declares that Fenris and Aashdoshan are dying but there is nothing he can do. Luckily, Lakima remembers the 3 pots of healing potion they found in the Lizard Man tomb. One is given to Aashdoshan and one to Fenris reviving the two lucky heroes.

After this incident, the entire group decides to rest for a while in the alchemy lab (the bedroom is a burned mess of debris and ash).


Friday 16 July 2021

Baltron's Beacon The Gatehouse

Two weeks ago the players in my Swords & Wizardry campaign got into the meat of adventure I7: Baltron's Beacon. They spent the entire session assaulting the brigands holed up in the Gatehouse to the keep.

This session was a struggle to GM. Most of the action occurred in the gatehouse. For Roll20 I had created a map for each level. But since the gatehouse was comprised of two towers I was constantly moving between the three maps. I could have put all of the maps on one page but I have tried that in the past and found it was also a problem. It felt clumsy.

Of course, if I were running this on a tabletop face-to-face it would not have been a concern.

Session 58: Assault on the Gatehouse

Lakima (human magic-user), Eathwund (human fighter), Alonso (human fighter), Aashdoshan (human necromancer), Domago (human cleric NPC), Lantosh (human fighter NPC), Fenris the Filch (human thief NPC), Vervork Merwin (human fighter NPC).

First, going back a few days, Aashdoshan the Grey directs a pair of lizardfolk zombies to carry the corpses of Sakatha and one of his vampire brides up out of the Tomb of the Lizard King and into the sunlight. Both corpses burst into flames and are burned down to ashes. Aashdoshan sets out on a raft in the direction he believes leads to Whetwhistle. But after two days of travel, he realizes he is lost. In the distance, he can make out the beacon from the Tower of the Green Flame. He makes his way toward it recognizing that it is near the Dolm River. He passes near the beacon and continues east in the direction of the river but stops when he sees the smoke from cookfires signaling a settlement. Aashdoshan enters a small hamlet of a few buildings in the swamp. He does not realize it now, but he has arrived at Bleakmarsh.

Back with the rest of the Company of the Black Dragon, they rest overnight on the floor of the Mended Net Tavern in Bleakmarsh after an evening spent killing weretoads. In the morning they are surprised when Aashdoshan enters the tavern alone. Lakima and Alonso get Aashdoshan caught up on their latest mission – to destroy the source of the magical component of the potions of Human Control they found in the Tomb of the Lizard King. Aashdoshan meets Petra the tinker/entertainer. Lakima explains that they pulled Petra from the swamps the previous day. Petra tells everyone that she will need to convince One-eyed Harald to loan her some horses to pull her wagon from the swamp. Aashdoshan tells her that he might be able to help her if she waits a few days. Petra asks how but then waves him off telling him that she needs to pull the wagon out now. There are valuables in it. Aashdoshan then asks the rest of the adventurers if they want to help pull this wagon out of the swamp. After some reluctance, everyone agrees to do it.

The entire Company of the Black Dragon walks with a Petra a mile away to where her wagon is slowly sinking deeper into the swamp. On the way, Aashdoshan waves his arms and a pair of undead lizardfolk emerge from the swamps. Petra is concerned at first but seems to accept the new companions, although she keeps her distance. The two zombies are sent with a grappling hook and rope out to the wagon. The zombies affix the hook and move to the far end of the wagon and try to push it free. The rest of the company grab the rope and tugs. Eathwund and Alonso, who are doing most of the work, find they have no purchase in the loose soil of the causeway. They get out the block and tackle from the Bag of Holding and attach it to a nearby tree trunk. With the increased leverage they slowly drag the wagon out of the mud and up onto the causeway. In the process, one of the front wheels is shattered. Petra heads into the wagon and retrieves some valuables. Aashdoshan suggests she might want to join them on their expedition to the nearby keep but she declines. Lakima suggests that she move to Whetwhistle where she can find work and he would be willing to stake her some gold. Petra tells them she is not interested. She enjoys her traveling life.

The adventurers wave goodbye to Petra and set out across the causeway. They pass Bleakmarsh and march the short distance to the Keep. From the causeway about a mile from the Keep, they can see that it is perched on a tall hill, surrounded by ruined walls and towers. Only the Gatehouse appears intact. The Keep itself partially collapsed in one corner from which the beacon of light emerges and shines straight up into the sky for hundreds of feet. The causeway continues directly to the keep crossing two stone bridges.

Lakima sends Fenris ahead to the first stone bridge. Aashdoshan sends two zombies to accompany him. Fenris carefully crosses onto the bridge and waves everyone ahead indicating there is no danger. The adventurers walk along the causeway toward the bridge with Keep on the hill looking down at them. As Fenris crosses the bridge, two enormous trolls emerge from the reeds of the swamp and rush toward him. Alonso and Eathwund rush onto the bridge but two more trolls rise up on their side of the bridge and attack as well. Eathwund activates his ring and his sword bursts into flames as it strikes the troll nearest him. The troll shrinks back from the flaming sword. Meanwhile, Alonso strikes the other troll with his sword. Fenris runs back to the center of the bridge with two trolls following him. Two more trolls emerge from the river beneath the bridge and make from the riverbank. Aashdoshan sends his lizardfolk zombies to aid Fenris and they manage to allow Fenris to get to safety. However, the trolls soon destroy both zombies. Lakima shouts at Fenris to get out of the way and then he casts Fireball, enveloping four trolls in an explosion of fire. When the fire clears, two trolls are down seemingly destroyed. One jumps in the river and swims away to the north. Eathwund chops down one of the trolls with his flaming sword, and Vervork and Alonso attack the other troll. A second, badly burned troll flees to the north. Alonso kills the final troll and Lantosh uses a torch to light the corpse on fire so it cannot regenerate.

The adventurers discuss whether to follow the trolls who appear to have entered a cave on the side of the riverbank. At first, they decide to follow but once Lakima sees the swamp they will have to wade through he calls it off. The trolls are allowed to escape.


Fenris takes the lead again and walks to the second stone bridge. He checks the banks and under the bridge carefully, all of the whiles carefully watching the looming gatehouse a short distance away. He returns and tells them that the bridge looks safe. They pass over the bridge without incident. A crude temporary bridge of wooden blanks crosses the final river in the shadow of the gatehouse. Aashdoshan sends his remaining skeleton across the river and it wanders about the gatehouse. But there is no sign of life from the gatehouse. Finally, everyone crosses the plank bridge and stands in the entryway between the two four-story towers of the gatehouse. There are a few arrow slits in the tower walls but no sign of activity. Fenris slips through the open gates and under the portcullis into the yard of the keep. He comes back and reports that the south tower has a door on the ground floor facing the keep. He also notes that there is a piece of parchment attached to the door. Lakima asks Fenris what it says on the parchment and he shrugs his shoulders, “I did not think to look.” Fenris goes back to check the door again just when Lakima says, “Wait it could be a trap!” At that moment there is a loud boom and a flash of fire from the front of the keep. The adventurers run into the courtyard and see a blackened wood door still smoking. Also, still smoking is Fenris crumpled on the ground before the door. Aashdoshan runs over to Fenris and performs a life transfer ritual to heal Fenris of most of his wounds. Fenris staggers to his feet as Lakima admonishes him to be more careful.

As the adventurers are discussing the trapped door, the door swings inward and they see a surprised man standing in the doorway. He yells outs something and quickly tries to slam the door shut. However, Eathwund leaps forward and stabs the man in the chest killing him. Alonso rushes through the door and sees a second man. Before this man can even draw his sword, Alonso has run him through. Inside the first floor of the Tower, they find they are in a stable. Two agitated horses are standing in a pair of wooden stalls. A ladder leads up to a trapdoor at the far wall.

The rest of the company follows Alonso and Eathwund into the tower room. Alonso heads up the latter to a trap door and shoulders it open. He looks into the room above and sees a large number of surprised bandits. Some are grabbing for weapons but others look like they are just awakened from a nap. Alonso quickly ascends the ladder followed by Eathwund. The two heroes push into the group of nine bandits. Within moments Eathwund and Alonso kill six of the bandits. The bandits barely get a chance to slash at the two heroes with their blades. As Lakima climbs up the ladder into the room he sees the bandits’ leader drop his weapon and yell, “Wait! Wait! We surrender!” Aashdoshan, Lantosh, Vervork, Domago, and Fenris also climb up the ladder into the room. The bandit leader tells them that he works for a brigand named Leptor. But that they have not been paid and just want to leave. The adventurers accept the parlay and let the three remaining bandits leave down the ladder. They watch from an arrow slit as the three bandits jog along the causeway toward Bleakmarsh.

A ladder in the room leads up to a trapdoor in the ceiling. As they discuss who should go up Fenris tells them he can hear several footsteps approaching from the door to the west. Lakima tells the fighters to get to the front of the group and everyone else to get behind them. The door swings open and a bugbear armed with an ax stands in the doorway. The bugbear snarls and steps into the chamber only to be felled with one swing by Eathwund. Two more bugbears appear and are dispatched by Alonso with help from Eathwund and Vervork. Alonso sees another bugbear at the end of the hallway. He runs after it as the bugbear tries to flee. Alonso catches up to the bugbear as it opens a door onto the battlements. He cuts it down before it can escape. While most of the adventurers look about the chamber of the bandits, Alonso and Eathwund search amongst the other chamber. Fenris reports that the trapdoor overhead is bolted shut from the other side. He tries but he is unable to get it open.

The adventurers head to the southern tower room. Lakima spots a trapdoor under some crates that have been packed full of rocks. Lantosh removed enough rocks to be able to move the crates aside unblocking the trapdoor. Eathwund opens the trapdoor and peers down into a chamber with no doors. It looks like a storage room but one wall is collapsed allowing the weather into the chamber. Everything looks like it is rotten and useless.

Unable to access the next level by the trapdoors the adventurers congregate in the chamber where they fought the bandits. Fenris says that he can hear several large animals moving about above their heads, including what sounds like a horse? Lakima asks Fenris if he can climb up the exterior wall of the keep to the next level. Fenris steps out the door and onto the wall and looks up spotting an arrow slit. He nods and scrambles up the wall until he can peer into the arrow slit. Fenris climbs back down and reports that the chamber above them is crowded with several men, most of whom are armored. He also tells them that he saw an enormous wolf and a hippogriff.

Lakima asks Fenris if he can climb all of the ways up the side of the tower to the roof to see if there is a trapdoor down into the 3rd floor above them. Fenris climbs up, stumbles once, and makes it to the top of the tower roof which is lined with battlements. Fenris spots a trapdoor on the floor and signals for everyone else to come up. Fenris ties off a 50-foot rope to a crenelation and tosses the rope down to the lower level. Alonso climbs up followed by Lantosh and Vervork. Eathwund comes up next. As he is passing the arrow slit on the third floor, he hears a shout of alarm and someone shoots at him with an arrow but it misses. Eathwund climbs up the remaining distance and makes it to the roof. Down below, Lakima and Aashdoshan witness the attack on Eathwund. Lakima tosses a fireball in through the arrow slit. What follows is a large explosion and fire and smoke shoot out of the arrow slit. The heroes on the third floor hear screaming and yelling from above. The heroes on the roof see the trapdoor heave up and smoke pour out from under it. They hear cries as well but it sounds like a horse screaming. Alonso takes his sword and smashes the trapdoor. Eathwund looks over the parapet and sees a burning man run across the parapet one level below and open the door to the south tower and vanish inside.


Alonso gets the trapdoor on the roof open and descends a blackened ladder into a scene of carnage. Dead bodies are piled all over the floor. He sees several humans, a huge wolf, and what he at first mistakes for a child but is relieved to see if actually a gnome. In one corner of the room is a panicked and badly injured hippogriff straining a rope attached from its muzzle to the wall. Alonso and Eathwund descend into the chamber.

Below on the second floor, Aashdoshan, Lakima, and Domago see a man slide down the ladder in the south tower onto the second floor. The man then angrily advances toward them across the hall with a murderous look on his face. Aashdoshan sends three zombies he raised from dead bandits to confront the man. The man proves to be a skilled fighter and one zombie quickly falls. Lakima casts Charm person but it fails to stop the man. The remaining zombies do slow him down. Lakima yells at the man to surrender but he just laughs. Behind him they see Alonso and Eathwund climbing down the ladder into the south tower 2nd floor. Aashdoshan casts hold person on the man but it does not work. The man turns to face Alonso and Eathwund. He manages to expertly parry the blows from both fighters although one strike from Eathwund does get through his defenses. The two zombies continue to attack. With the man concentrating on defending himself from Eathwund and Alonso, one of the zombies is able to repeatedly strike the man in the back. Lakima tries again casting Mikda-Err’s Practical Tilt – but the man seems unfazed by it.

The man now has had enough with the spells being cast him and he turns and rushes toward Lakima and Aashdoshan. Before he can get to them Lakima casts Wall of Iron and an enormous wall springs up blocking the hallway (and extending out into the countryside). On the other side of the wall, one of the zombies hits the man again. Eathwund stabs him again. The man finally, tosses down his sword and surrenders. But to his dismay, the zombies follow their last command and continue to attack. Eventually, with Alonso and Lantosh shouting for him to stop the zombies, Aashdoshan gives the command for them to stop fighting.

Eathwund and Alonso question the man and learn his name is Leptor. He claims to be a poor bandit just trying to earn enough to feed his men. They correctly deduce that he is a ranger tossed out of his order. The man claims the title of Giantbane. After a few hours, the Wall of Iron spell comes to an end and the wall vanishes. Aashdoshan and Lakima join the interrogation. Lakima questions the man for an hour and learns that he is working for a mage named Antarcus who is on the keep on the hill. Antarcus hired him to provide protection with the promise for a share of the vast treasure that the mage Balutron was said to have kept in the Keep. They learn that Balutron came to the abandoned keep forty years ago and apparently perished in a failed experiment that produced the magical beacon. Lakima tries to bribe Leptor to work for the Company of the Black Dragons with an offer of 200 gold but Leptor sneers at the paltry fee. Aashdoshan touches Leptor with his staff of withering aging Leptor ten years. He leans over to threaten Leptor but finds he is unconscious. When he is brought back awake, Aashdoshan threatens Leptor with more aging and worse. Lakima manages to talk down the necromancer but the die is cast and it is clear Leptor has nothing more to say to them. Lakima and Alonso decide to let him go if he leaves the area immediately. Alonso even returns Leptor his longsword and frees his legs. But he leaves his hands tied. Leptor is allowed to leave and they watch him limp down the causeway toward Bleakmarsh.

Lakima, Eathwund, and Alonso check the injured hippogriff and find it needs to heal before it can fly. They also realize that this is the same hippogriff they sold to a mage almost six months ago. Lakima looks about the chamber for something to feed the hippogriff. When he returns to the beast he finds it munching on the dead gnome. They make a search of the second and third floors of the gatehouse and find a small amount of gold and gems. Lakima also finds the Gnomish magic-users two spellbooks. He gives one to Aashdoshan.

It is now well into the afternoon and a number of the heroes are injured or without spells so the decision is made to fortify a room of the gatehouse and rest for the remainder of the day. The Keep and the mage Antarcus can wait until the morrow.

Sunday 11 July 2021

The Beast of Bleakmarsh

A few weeks ago we finished the Tomb of the Lizard King in my Swords & Wizardry campaign and in the next session moved on to a rewriting of I7: Baltron's Beacon. Baltron's Beacon is an AD&D adventure released by TSR in 1985. Written by Phillip Meyers. I have made a number of changes to the plot but I have kept much of the locations the same. I have always wanted to run players through this adventure and now I finally get the chance.

First I added The Beast of Bleakmarsh to the start. This adventure is a 5th Edition Pocket Sized Perils adventure written and illustrated by Brendan Barnett. The style of these Pocket Sized Perils is a short flipbook of illustrations with notes for a short encounter. I fleshed it out a little and made some changes to fit my campaign. The village of Bleakmarsh, the tinker, and the were-toads was from this adventure.

Session 57: Welcome to Bleakmarsh

Lakima (human magic-user), Eathwund (human fighter), Alonso (human fighter), Domago (human cleric NPC), Lantosh (human fighter NPC), Fenris the Filch (human thief NPC), Vervork (human fighter NPC).

When last we left them, the heroes were spending the night on an island in the Cursed Marsh the guests of a group of "explorers". Accompanying them are a host of rescued humans from the Hillside villages.

The night spent on the island in the swamp is uneventful. The next day Aashdoshan tells his companions he is concerned about leaving Sakatha staked in his coffin. If a Lizard Man returned and removed the stake Sakatha would regenerate. Aashdoshan decides to return to the Tomb alone (sort of he has a few undead companions) to deal with Sakatha. The rest of the adventurers press on escorting the thirty or more villagers to Whetwhistle. Once they arrive they are greeted by Wexley and several mercenaries he has hired. The villagers are put up in the Mining Bunkhouse overnight. Many of them head south alone the next day. A few ask to travel with the adventurers to Edgerton. A few also decide to stay in Whetwhistle where there is available work.

It takes the heroes a little longer to get to Edgerton than normal as they are escorting some refugees on foot. Once in Edgerton, they part with the refugees and head to their Chapter House. Everyone takes a well-deserved rest. Later in the day Lakima, Eathwund, and Alonso head over to the Keep and speak with Lawlord Brightmoor. He is happy to hear they have rescued the people of the Hillside farms and killed the dragon. But he is concerned when Lakima mentions an undead Lizard Man and potions of human control. He feigns reluctance to hand over the deed to the Radu Manor house but relents when he gets a promise of another favor to the Earldom.

Alonso meets with Cromly the smith to commission another project. He hands over another bag of black dragon scales and requests a shield. He also shows Cromly the skull from the Demon and asks for a helmet. Cromly is doubtful stating it would only have decorative value but he agrees to do the project.

The heroes meet once more that evening and the loot from the venture into the Cursed Marshes is divided up. Lakima identifies the magic items - some of which are very powerful (hello - Ring of Wishes). Some items are placed in the vault.

A message arrives from Lord Brightmoor asking for a meeting. Lakima, Eathwund, Fenris, and Alonso set out again for the Keep. Brightmoor tells them his sage has transcribed the notes Lakima found in the Tomb. They detail a source for Potions of Human control in the Tower of the Green Flame in the Cursed Marshes. It is in an area near the Dolm River called the Bleakmarsh. He asks them to go to the Tower and destroy or secure the source.

Lakima goes to the docks and hires riverman Dunstan and some of his men to man some boats for them to take them to Bleakmarsh. Aashdoshan not having shown up yet, it is only Lakima, Eathwund, Alonso, Domago, Vervork, Lantosh, and Fenris.

Later in the day, Dunstan drops off the adventurers at a causeway in the swamp. He tells them that it heads through the swamp to the keep where the Tower of the Green Flame stands. He also tells them that there is a small, outlaw village in the swamp along the trail.

They set out on the causeway which rises a few feet above the surrounding mire. They do see plenty of signs that the causeway is in frequent use by travelers on foot and horseback.  After a few hours, they hear shouts of “Help! Help!” and come upon a woman stranded up in a dead tree over the swamp. Her wagon half-submerged nearby. The woman warns them that something under in the water devoured her horses. Lakima levitates over to the woman and manages to carry her back to the causeway (after she strips off her heavy equipment). She introduces herself as Petra, a tinker, merchant, and entertainer. She asks for help in recovering her wagon and equipment but there are no clever ideas to do this. So, she leads them to the nearby hamlet of Bleakmarsh.

There is no sign proclaiming that the name of the community is Bleakmarsh but Petra assures them that this is indeed the name the locals use. She leads them to the Mended Net Tavern where they can get some food and rest. The locals are a suspicious lot and direct a number of glares at the heroes. But once it begins to get dark and the cheap ale is flowing, they start to loosen up. They overhear talk of a monstrous beast from the swamp that has taken away three villagers in the last few days. Lakima strikes up a conversation with a local who gives his name as Jim who seems to have several contradictory stories about the beast. He suggests Glynda the witch might have something to do with it. Or maybe Old Yiss the local Lizard Man king. The barkeep tells Jim to keep his mouth shut when he starts talking about the residents of the nearby keep.

Eathwund and Lakima wander over to Glynda’s shack to see if the old witch knows anything. She turns out to be an old woman who knows a lot about local herbs and not a practitioner of magic. She does tell them some of the local gossip. Lakima casts a Circle of Protection for her so she can remain safe in her home. As they leave the shack they hear someone screaming. They run to the source of the noise and see a giant toad standing on its hind legs dragging off one of the locals. Eathwund and Lakima run after it. They are joined by Alonso who had stepped outside the Tavern to get some air.

They follow the creature to the edge of the swamp and see it bound across to the local cemetery and disappear. Eathwund curses, and decides to hop in the swamp to follow it. Luckily, the muddy water only comes up to his hips. The others follow. On the island, they find a dozen stone grave markers and a stone crypt. Pushing back the lid of the crypt they see a set of steps leading down. At the bottom, they can see swamp water. Alonso and Eathwund proceed down first followed by Lakima. They spot the giant toad-man in the center of a large stone chamber. Other villagers can be seen stuck to stone pillars with a clear gooey substance. On the far wall, they see an altar of a frog god. The toad-man tosses his captive aside and moves to attack. Alonso moves away from Eathwund to spread out and almost steps in a huge clutch of translucent eggs floating in the swamp water. Alonso strikes at the eggs with his sword and slices a dozen eggs open. Vicious giant pollywogs float out and attack him with mouths full of razor-sharp teeth. Meanwhile, Eathwund is attacked by the toad creature. A second toad creature steps out of the shadows to attack Alonso. The villager runs past Lakima for the stair.


Lakima casts sleep on the pollywogs and they go limp and stop attacking Alonso. Eathwund actives his ring spreading fire up his sword and he kills the toad creature with two swift blows. As the creature falls away, he watches in astonishment as it transforms into a portly, middle-aged man. Alonso kills the second toad creature and watches it transform into a middle-aged woman. 

Alonso and Eathwund free the three villagers from the gooey material that was keeping them bound to the pillars. One of them who tells them his name is Martin explains that the toad creatures were the villager friar Seaton and the woman is Marsha a local fisherwoman. They are helped back to the village.

There is quite an uproar as the heroes return to the tavern with four villagers in tow. Martin even whispers to them that some outlaws are holed up in the nearby Keep. The villagers trade with the outlaws so they keep quiet about them.